Showing posts with label DIY. Show all posts

December 21, 2011

Vehicular Blow Dryer


You have your basics like eating while driving (easy), and your not so basics like changing your pants while driving (tricky.) But today I discovered a new one: hair drying.


If you are running late out the door with soaking wet hair, no worries. Put your car heater on high and blast it, lean a little forward and aim the vents at your head. In less time than it would take a blow dryer, your hair will be dry! I just got an infomercial vibe to those last sentences. It also helps that I have short, fine hair but still, very impressed at the speed I was able to dry it (about 4 minutes on the freeway.) Would also recommend some sort of frizz serum before leaving your house. Oh man, I'm going to keep doing this...although it might not work in the summer as it will be too hot to take the heater on full blast. Also, maybe not on the freeway, how about at red lights?

Why yes, I am a bad driver.

♥always,
Marisol

December 19, 2011

Moving on...

I'm moving, let's just say she's in progress. Yes, my apartment is a girl. She's having some major work done ;)


Cant wait to see her final look.

♥always,
Marisol

January 22, 2011

Tiny Room Makeover: Bed Issues

Remember the Tiny Room Make over? The plan? The furniture? Well, good thing you do. It's still going on. Slowly but surely. Remember how I said that Murphy's Law applies to me when I attempt projects. "Anything that can go wrong, will go wrong". Remember how excited I was about finding my bed?
 So excited that I didn't even properly photo shop the lines out the original picture. Well, I was SO excited that when I couldn't find my pretty purple 25' tape measure, I used my Mom's 3' foot plastic one that she uses for taking sewing measurements. Yes, that was my mistake.

After opening the 5 million pieces needed to assemble the new bed and the hour it took me and my Dad to assemble the bed (by "me and my Dad" I men my Dad assembled the bed while I passed him pieces and held things in place and watched) it finally came time to place it in it's corner.

It didn't fit.My heart sank.
ME: What??? Are you sure Dad? But I measured it.
DAD: Well you measured wrong then, Mija. It doesn't fit. Look. (takes out his retractable measuring tape, yup it was off by just under 1 inch.)
ME: Well, I used my Mom's measuring tape.
DAD: HahahahJajajajaHa (yes, my Dad laughed at me in English & Spanish)
After seeing the completely frustrated/sad look on my face he stopped laughing and went back into Super Dad mode.
DAD: I can fix it!
ME: How?
DAD: I have an idea. (said while giving me his best I'm a genius smile and holding up his index finger)
So began a bunch of genius ideas...
1. Cut out the outline of the baseboard on the wood of the bed.

Failed. Still did not fit as we could only make the cut to the headboard.

2. Remove the baseboard!

Fail! The bed still did not fit, but we were getting close.

3. Sand down the back of the headboard until it fits.

Fail! This job made my Dad sweat.

What we thought was going to be a little bit of a sanding job turned into an hours worth of work. We did actually manage to make the bed fit sort of, it was very tight and it was not even. It turns out that my room is actually a trapezoid. Let me draw it for you:

Remember how I said my room was an addition to an addition to the house? Obviously they didn't hire an architect. A trapezoid!?! Seriously. So while my original measurements were slightly off, the reason the bed still didn't fit and our attempts were massive fails was because in one area I was 2 inches off.


Not sure if it was the fact that I now had scratched up paint, oh pretty blue paint I'm so sorry. Or that my Dad was still trying to make the obviously-not-going-to-fit-bed, fit. Or the sinking feeling that This bed was now most definitely not refundable. Or maybe a combination of all 3 but that night I decided NO HEADBOARD! Yup, that's right. I changed my mind. That's the look I wanted anyway. Plus the headboard was detachable. Two minutes later my bed fit.

I slept in my new headboard-less bead that night. The following morning I knew it wouldn't do. Then the heavens parted and the angels began to sing (a la Windows commercial style) while the following idea came to me: "Why don't you just build a headboard, Marisol?!"

Until next time folks -- the makeover continues...


November 1, 2010

Tiny Room Makeover: The Great Bed Frame Search Extravaganza!

To begin my little makeover, you member? No...awkward, well, how about you read this this: Tiny Room Makeover: The Plan Than come on back here... Or just keep reading...

I decided to first work on the big things like the furniture and move around from there. I already knew what dresser I wanted and from where.

Meet the Malm 6 Drawer Chest in Black Brown found in Ikea:

It looks more black than brown in this picture but I like it that way. I first tried looking all over Craigslist for this dresser but after about a month of searching...no luck. So I decided to move on and buy a brand spanking new one. For $159 its not too bad. Although in my head I like to price things based on what I believe they should be. In my head this should be more like $89.99 but whatever...

Then came the search for my new bed. I knew what I wanted and from where. Meet the West Elm Storage bed:

This bed is exactly what I was looking for. It met all of my criteria.
-Twin size
-At least 3 drawers for storage. Preferable with no handles.
-Black-Brown in color.
-No headboard.
-Priced under $200.....oy. Problem. Selling at $1,199.00 (special $899, yeah still a problem) it soooo does not meet my final and most important criteria. So began my search for my bed.

My first Google search lead me to some beautiful beds like the West Elm but unfortunately none that fit my criteria. Some just came in the wrong color or were not available in a Twin Size...I spent about an hour searching when I came upon this PrePac Espresso Twin Platform Storage Bed:


Not as modern and pretty as the West Elm bed but it was close. I found it on Ebay for $199.99 plus $60 for shipping and handling. I did not jump out of my seat or anything but I was excited I was getting close. My continuing search lead me to Wal-Mart's website. While I'm not a fan of the store (except to load up on Christmas decorations!!! You better believe there will be a post about that!) I started to look around. I found some close matches and while they had me at the correct price I just did not like them...

South Shore Cosmos Twin Mates Bed - $149.94

I really, really dislike these handles but its very close...I dislike those handles very much.

South Shore - Cakao Twin-Size Mate's Bed - $139.99

This one was much sleeker looking but those handles...those are just some serious bruising waiting to happen. I thought I could just remove them but then I would have a hole. Also the review said it was actually black not brown. But even with all this it was the closest I had gotten.

Right when I was about to give up I came across this:


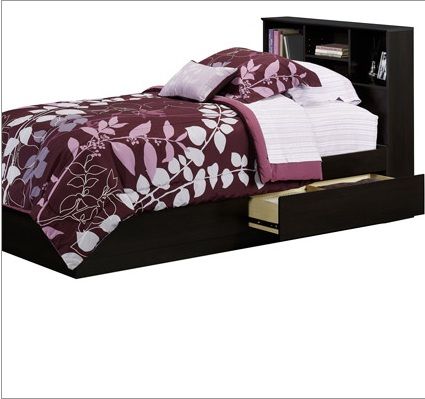
Mainstays Twin Storage Bed with Headboard - $159.99

Ignore the headboard for a moment...and the gray lines around the picture I failed to remove...This bed frame was just what i was looking for. The two drawers were split into 2 inside so I would be getting 4! Color, price, size!! AND NO HANDLES!!!!

Now about that pesky headboard...I decided I could live with it. I didn't want a headboard but looking at this one I figured I could place my alarm clock on it..A picture frame and my current readings...Sold!!

So after searching the Internet a few more days including eBay and Cragislist...I looked over my final selection made some measurements and headed on over to my local Walmart to make my purchase. Followed by a trip to Ikea to pick up my Drawer.

I headed home and Papa Bear and I began putting my furniture together. The dresser came together perfectly. The bed frame however...PROBLEM!!!!!!!!!!!!!!!! To be continued...


October 1, 2010

Tiny Room Makeover: The Plan

I have a tiny bedroom. Itty bitty, tiny room. When my family moved into this house there were 3 bedrooms...or so I was told. Long story but I did not see this house until the day we moved in. The "3rd" bedroom was actualy added on to the house and used as nursery. There were even those glow in the dark stars glued to the ceiling. This is what it looks like now:


My choices were to share a room or get a tiny room. I took the tiny room. I shared a room all my life so having a space to call my own, even a 7'x7'7" space, was a big deal to me. Plus the privacy of shutting a door!!! You cant beat that!

I first painted the walls a nice soothing yellow, with green curtains and flowery bed spread to match plus white furniture...it remained like that for about 4 years. One day sometime last year I walked in and realized..."It looks like a nursery in here!"

I wish I had some pictures from those times so you could see what I mean. I immidiately decided to paint and change my color pallet. Make my room more adult looking and modern yet still softly feminine. While scrolling the internet for inspiration I came across this bed spread:


Bam, Wam! I could not stop looking at it. I decided to use the blue for my walls and all the browns I saw were to be incorporated into the room somehow! Done!

So up went the blue paint, the crisp white trim and the dark brown curtains. I began dreaming my entire room in my head. Unfortunately that's as far as the make over went after painting, a dream in my head. So it looks like a boys nursery and I have 2 empty walls, one with a sad old TV I hardly watch anymore...


Another wall that is just...plain...
A a really old, scratched up dresser in the wrong brown color, and a messy, does nothing but collect my junk, book case....


So here's the plan:

  1. Get new furniture that is cohesive and functional. Sell old furniture.

  2. Incorporate more storage via shelves and any means possible.

  3. Find some kind of seating that will work with the space...(tough one)

  4. Create a mural for photo frames and include a map (map will be explained later)

  5. Find a better area rug and some decorating elements.
So that's the plan. 5 simple steps, that I hopefully can complete. Technically phase one of the plan would have been the paint, phase two the curtains and so on but let's start fresh! WooHoo! I've got a project to do! Here is where I should warn you. Every time I take on a problem um... project, Murphy's law will apply.

Here's my dream...


Related Posts Plugin for WordPress, Blogger...
ua-10399482-1